- Written by: Hummaid Naseer
- November 19, 2025
- Categories: Services & Products
Building an MVP often feels like a sprint; everyone’s eager to move fast, test ideas, and ship quickly. But without a clear roadmap, speed can easily turn into chaos. Teams lose focus, priorities blur, and what began as a lean, learning-focused experiment can spiral into scope creep and wasted effort.
A product roadmap acts as the north star for your MVP journey. It translates your vision and hypotheses into a structured, time-bound plan, showing not just what you’ll build, but why and when. With it, teams can stay aligned, make trade-offs confidently, and ensure that every feature or task connects back to a validated learning goal.
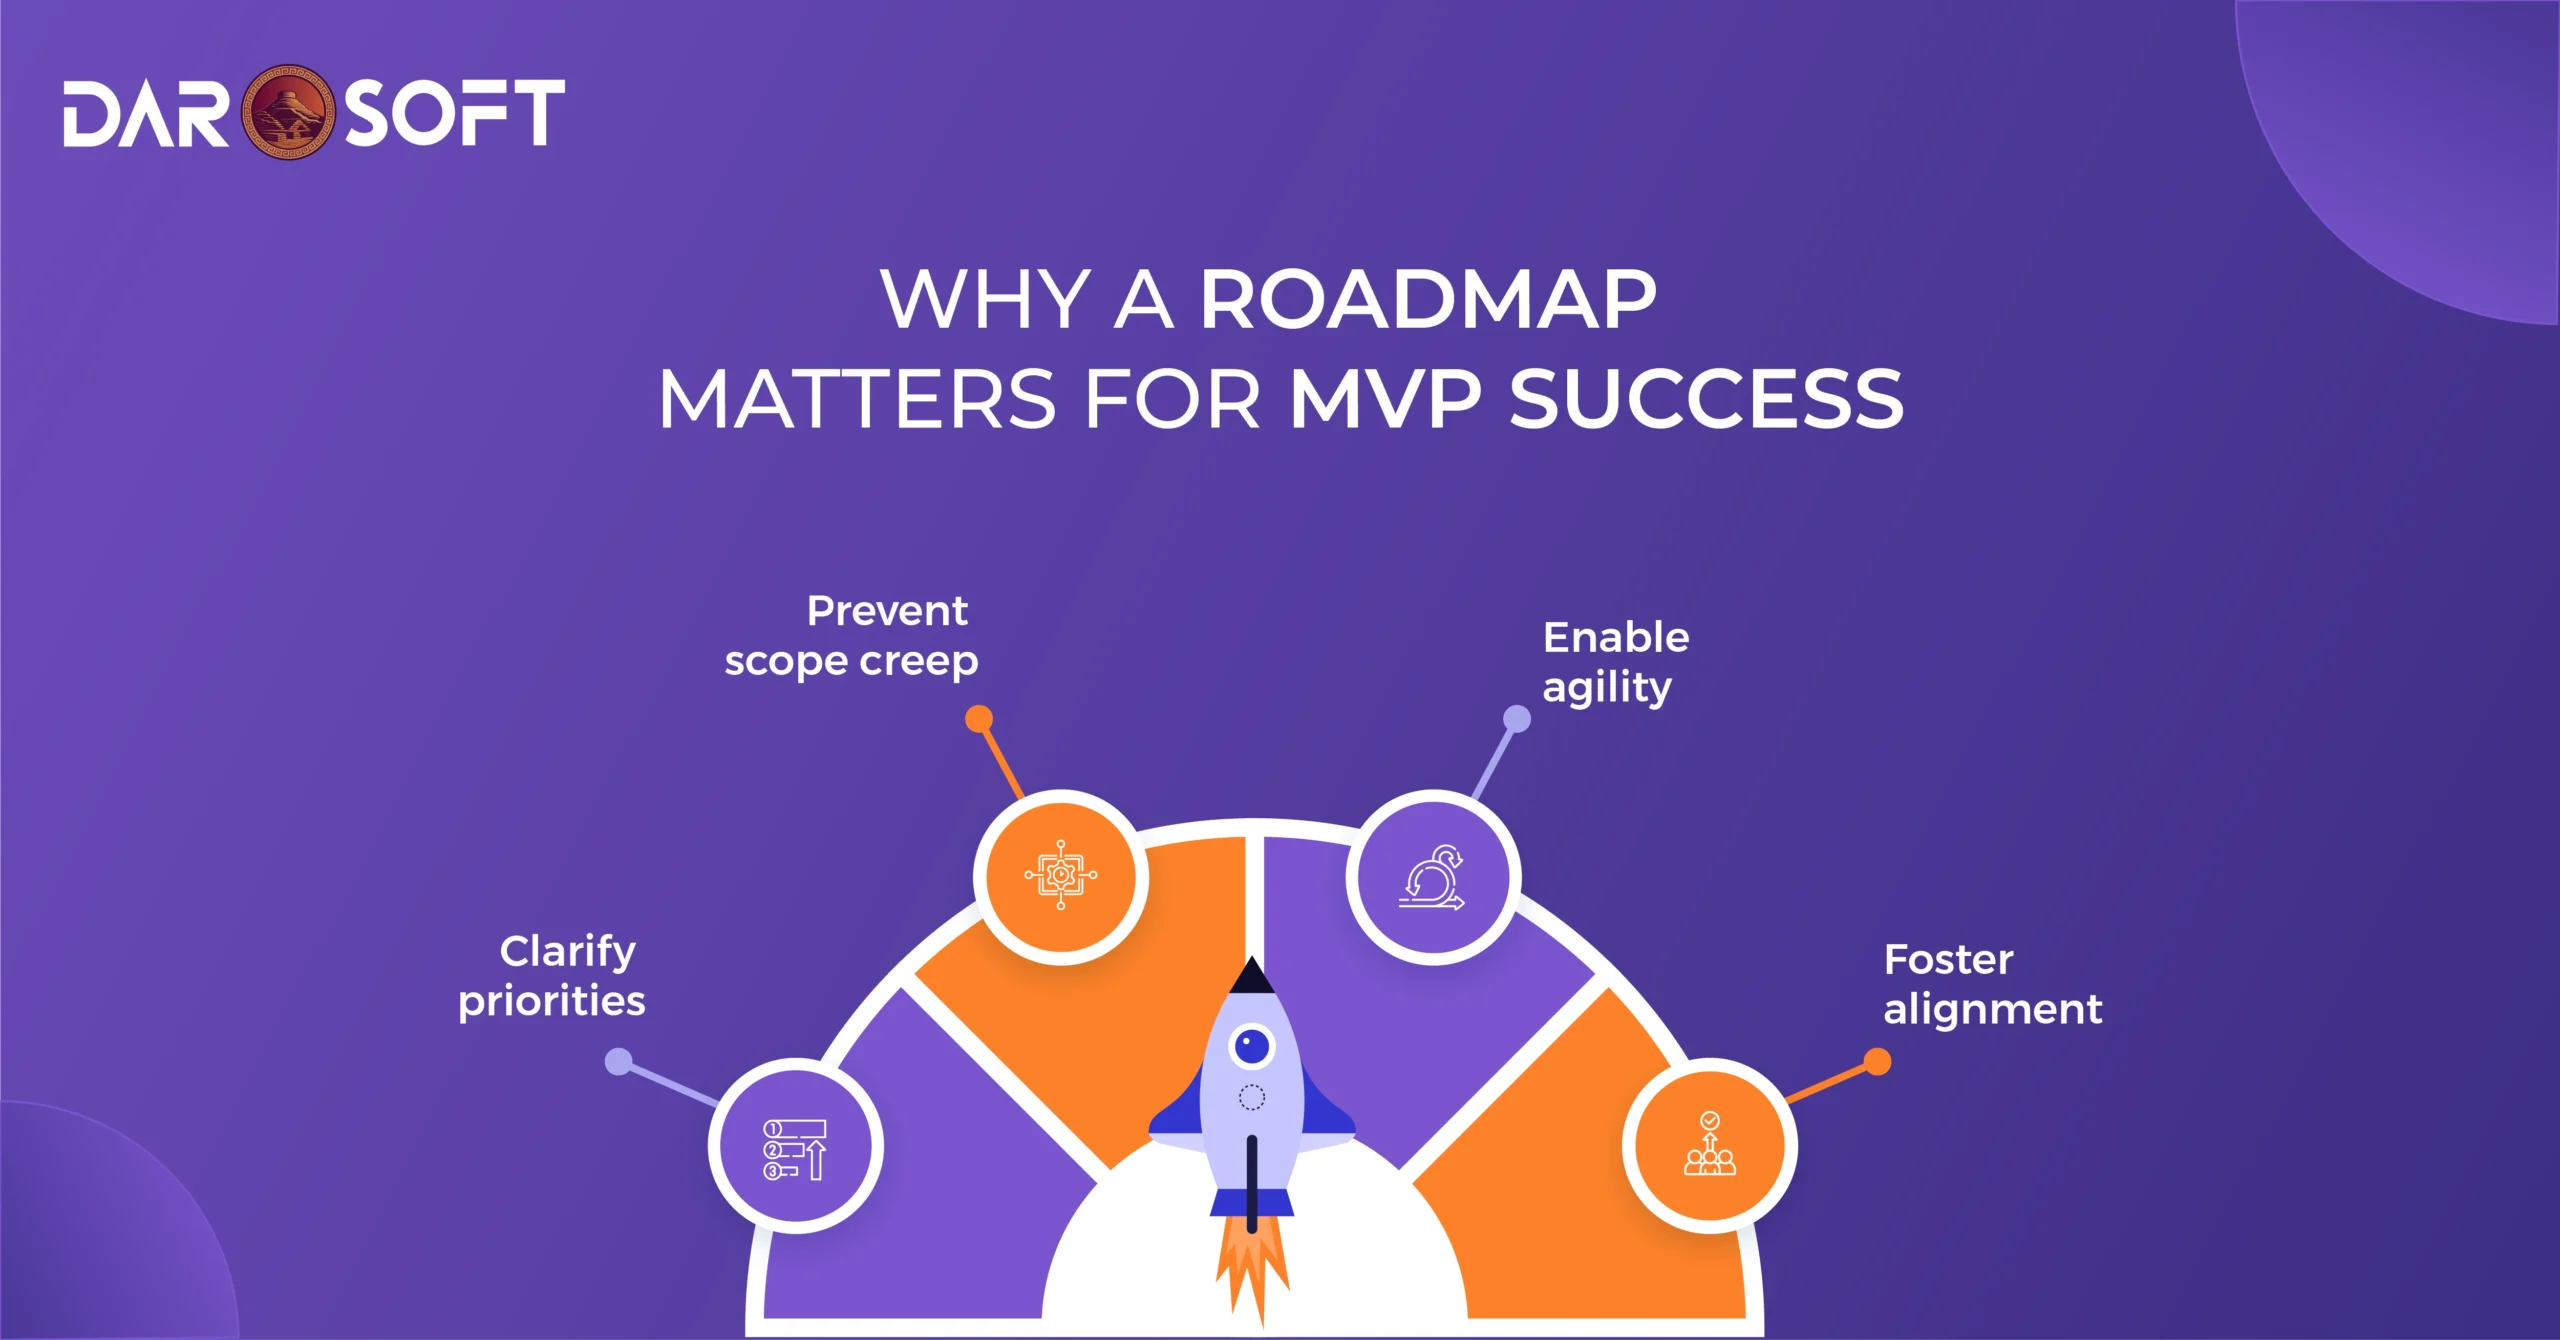
For early-stage products, this structure is especially critical. When resources are limited and uncertainty is high, a roadmap helps:
Clarify priorities: Keep everyone focused on the core value hypothesis instead of chasing nice-to-haves.
Prevent scope creep: Define clear boundaries for what’s “in” and what’s “out” of your MVP.
Enable agility: Provide direction without rigidity, allowing teams to pivot based on real feedback.
Foster alignment: Ensure founders, PMs, designers, and developers all share the same understanding of success.
Understanding the Goal of an MVP
Let’s be honest, the term Minimum Viable Product is often misunderstood. Many people hear “minimum” and think cheap, barebones, or half-finished. In reality, a true MVP isn’t about cutting corners. It’s about cutting uncertainty.
The goal of an MVP is to validate your assumptions with real users before you invest in full-scale development. It’s your first experiment, your opportunity to learn what actually matters, not what you think matters.
Think of it this way: launching an MVP is like shining a flashlight into the dark corners of your business idea. You’re not building the whole house, yet you’re checking if it’s even worth building there.
Here’s what makes an MVP so powerful:
It Tests Core Hypotheses: Every startup begins with guesses: who your users are, what problems they face, and what they’re willing to pay for. An MVP transforms those guesses into experiments you can actually measure.
It Invites Real Feedback Early: Instead of building in isolation and hoping users will love it, you release early and learn what they actually love or ignore.
It Minimizes Risk: Building a full product before validation is like betting all your savings on a hunch. MVPs let you test small, fail fast, and pivot before it’s too late.
It Fuels Smarter Roadmaps: Every insight from your MVP feeds directly into your next iteration. You stop guessing what to build next and start building based on evidence.
Simply, an MVP isn’t a smaller product. It’s a smarter strategy. You’re not racing to the finish line; you’re mapping the right path to it.
Here’s the mindset shift every successful founder and PM embraces:
The purpose of an MVP is not to launch faster. It’s to learn faster.
So when you think “MVP,” don’t picture a weak version of your vision. Picture a laser-focused experiment designed to answer one critical question: “Is this idea worth building?”
Once you have that answer, the real product journey begins.
Stage 1: Idea Discovery and Problem Validation
Before you write a single line of code or sketch your first wireframe, pause and get crystal clear on why your product should exist. The MVP journey doesn’t start with features or design; it starts with understanding the problem and the people who face it.
Too many startups jump straight into building, only to discover later that they’ve solved a problem no one truly cares about. Stage 1 is where you make sure that doesn’t happen.
Here’s how to navigate this critical phase:
Step 1: Identify the Target User and Pain Point
Every great product starts with empathy. Ask yourself:
Who exactly am I building this for?
What pain or frustration are they dealing with today?
How are they solving (or struggling with) it right now?
Instead of guessing, immerse yourself in your user’s world. talk to them, observe them, and study how they behave. You’re not looking for surface-level complaints; you’re digging for real, recurring pain points that people would pay to have solved.
Pro Tip: Look for patterns. When 5 out of 10 people describe the same pain in slightly different words, you’ve found a problem worth validating.
Step 2: Validate Market Need Through Research, Interviews, or Surveys
Once you have a clear problem, it’s time to test whether it’s worth solving.
Conduct customer interviews to hear firsthand how users describe the issue.
Use surveys or polls to gauge demand and willingness to pay.
Perform competitor and market analysis, are others already solving it? If yes, what’s missing in their approach?
Validation doesn’t require fancy tools; it requires curiosity and honest conversations. The goal here is to confirm that the problem is real, frequent, and painful enough that users would actively seek a better solution.
“Fall in love with the problem, not the product.”. This stage is where that mantra truly applies.
Step 3: Define Success Metrics Early
Before moving forward, decide what validation looks like.
Ask yourself:
What evidence will convince me that this idea has potential?
Is it 100 survey responses saying “I’d pay for this”?
20 beta sign-ups in a week?
A consistent pattern of frustration in user interviews?
Defining clear success metrics upfront keeps you grounded in facts, not feelings. It gives your MVP a purpose. A measurable goal to learn from.
Why This Stage Matters
Skipping this step is like building a house on shaky ground. By deeply understanding the user, validating the problem, and setting measurable goals, you set a solid foundation for everything that follows, from MVP design to your long-term roadmap.
Because here’s the truth:
An MVP built on unvalidated assumptions isn’t “lean,” it’s just risky.
Stage 2: Define the Core Value Proposition
Now that you’ve validated the problem and identified your target audience, it’s time to articulate why your solution deserves their attention. This is where you move from “There’s a problem” to “Here’s why my solution matters.”
At this stage, you’re not building yet you’re defining the heart of your product: the Core Value Proposition (CVP).
Step 1: Outline What Makes Your Idea Valuable and Unique
Your value proposition answers one simple but powerful question:
“Why would someone choose your solution over doing nothing or using an alternative?”
To define this, combine three critical insights:
The Problem: What pain point are you solving?
The Solution: How does your product address that pain better, faster, or cheaper?
The Differentiator: What makes it distinct in a crowded market?
Example:
If users are overwhelmed by complex project management tools, your MVP’s value proposition might be:
“A simple, distraction-free task manager designed for freelancers who want clarity, not clutter.”
Your CVP should be clear enough that someone can understand your product’s value in one sentence. If it takes a paragraph to explain, it’s not focused enough yet.
Tip: Avoid vague buzzwords like “innovative” or “revolutionary.” Real users don’t care about adjectives; they care about outcomes.
Step 2: Translate Your Value Proposition into a Testable Hypothesis
A strong MVP isn’t built on assumptions. It’s built on hypotheses you can test.
Once you’ve defined your value proposition, convert it into a clear, measurable statement that your MVP will prove or disprove.
Here’s the formula:
If we [build this feature/solution], then [this user segment] will [take this action], because [it solves their problem in this way].
For example:
“If we launch a lightweight task manager for freelancers, they will sign up and use it daily because it helps them stay organized without the complexity of full-scale tools.”
This hypothesis gives your MVP a purpose, not to succeed, but to learn.
Step 3: Link Hypothesis to Validation Metrics
Don’t just define what you’ll test; decide how you’ll know it worked.
For the example above, metrics could include:
Number of sign-ups from the target audience
Daily active users in the first week
Retention rate after 7 or 14 days
Qualitative feedback on simplicity and usability
These metrics will later help you decide whether to refine, scale, or pivot your MVP.
Why This Stage Matters
Your Core Value Proposition is your North Star. It guides every product decision, keeps your MVP focused, and ensures you’re solving a problem people actually care about.
If Stage 1 was about discovering the problem, Stage 2 is about clarifying the promise, the unique value your MVP will deliver to validate that the problem is worth solving.
“A clear value proposition turns ideas into direction, and direction into traction.”
Stage 3: Prioritize Features and Define MVP Scope
Once your value proposition is clear, it’s tempting to start listing every exciting feature idea that comes to mind. After all, you want your MVP to shine, right?
But here’s the trap: trying to build everything at once is the fastest way to dilute focus, delay launch, and waste effort.
The real skill in MVP planning isn’t about adding more. It’s about ruthlessly prioritizing. In this stage, your mission is to define what must be built now versus what can wait until later.
Step 1: Start with Your Validation Goal
Before choosing features, revisit your core hypothesis from Stage 2.
Ask:
“What do I need to learn or prove through this MVP?”
Every feature that doesn’t directly contribute to that learning is a distraction.
For example, if your hypothesis is “Users will pay for a simpler project management tool,” then your MVP doesn’t need advanced analytics or integrations. It just needs task creation, organization, and basic collaboration.
Tie every feature back to your validation goal. If it doesn’t serve it, it doesn’t ship (yet).
Step 2: Use Prioritization Frameworks (MoSCoW or Kano)
MoSCoW Framework
A practical, internal prioritization method used to organize features by urgency and necessity:
Must-Have: Core features without which the MVP fails its purpose.
Should-Have: High-value features that can come later if time or resources allow.
Could-Have: Nice-to-haves that enhance experience but aren’t essential.
Won’t-Have (for now): Features deliberately postponed to avoid scope creep.
Example (for a task management MVP):
Must-Have → Create, assign, and track tasks
Should-Have → Due dates or reminders
Could-Have → Team chat or color-coded tags
Won’t-Have → Advanced reporting or integrations
This method keeps teams aligned and grounded, ensuring no one sneaks in “just one more” feature.
Kano Model
Kano takes a user-centric approach by ranking features based on customer satisfaction:
Basic Needs: Expected features. If missing, users will be frustrated.
Performance Features: The more of these you add, the happier users get.
Delighters: Unexpected features that spark joy but aren’t required for validation.
For an MVP, focus on a balance between basic and performance features. Delighters can wait until you’ve confirmed users actually want your core offering.
Pro Tip: Use MoSCoW for internal clarity and Kano for understanding user perception; combining both gives a balanced view of priorities.
Step 3: Define Your MVP Scope Clearly
Once you’ve prioritized, define your MVP in one clear sentence:
“Our MVP will include [X essential features] to test [Y hypothesis] with [Z audience].”
This statement becomes your team’s compass, a shared understanding of what success looks like right now.
Document the final feature set, timeline, and success metrics to prevent scope creep. Remember: your MVP’s goal isn’t to impress everyone; it’s to learn something valuable quickly.
Why This Stage Matters
MVP scope definition is where strategy meets discipline. It forces you to say “no” not because ideas are bad, but because timing matters.
When you prioritize with purpose:
You launch faster.
You collect feedback sooner.
You reduce the risk of building the wrong thing.
“Great MVPs aren’t built by adding more. They’re built by removing everything that doesn’t validate the vision.”
Stage 4: UX Design and Prototyping
With your MVP scope defined, it’s time to bring your idea to life, not through full-scale development yet, but through user experience design and prototyping. This stage bridges the gap between concept and reality, helping you visualize how users will actually interact with your product before a single line of code is written.
The goal here isn’t to perfect the design; it’s to understand how users think, move, and behave within your product. Great MVPs are born from great UX, not because they look pretty, but because they make sense to users from day one.
Step 1: Map User Flows: The “Journey Before the Screen”
Start by defining the key actions users will take to achieve their goals. This isn’t about colors or layouts, yet it’s about logic and simplicity.
Ask:
What’s the main task users need to complete?
How many steps does it take to get there?
Where might confusion or friction occur?
Create a user flow diagram that visually maps the journey from start to finish, from sign-up to first success. This ensures your MVP aligns with real user behavior, not internal assumptions.
Tip: Keep flows short and purposeful. Every extra click or screen increases drop-off and dilutes the validation focus.
Step 2: Create Wireframes and Low-Fidelity Layouts
Once the journey is clear, translate it into simple, black-and-white wireframes showing what goes where on each screen.
Wireframes help you:
Visualize structure before design.
Spot UX issues early.
Align your team around functionality, not aesthetics.
Tools like Figma, Balsamiq, or Whimsical make it easy to sketch out ideas collaboratively. Focus on hierarchy, navigation, and clarity. Users should instantly know what to do next.
Golden Rule: A good MVP wireframe isn’t about decoration; it’s about direction.
Step 3: Build Rapid Prototypes to Simulate Interaction
Next, evolve your wireframes into interactive prototypes that mimic the real user experience. These don’t need to be fully functional; they just need to feel real enough for users to explore.
Use no-code tools like Figma Prototype, Marvel, or InVision to simulate key flows (sign-up, core action, feedback loop).
This helps you test usability and comprehension before you commit development time.
Tip: Focus on your “aha moment”, that one core interaction where users realize your product’s value.
Step 4: Test Early and Gather Real Feedback
Now comes the most critical part, testing with real people.
Invite potential users (ideally from your target audience) to walk through the prototype. Observe how they interact:
Do they understand what the product does?
Can they easily complete the main task?
Where do they get stuck or confused?
Document their reactions, questions, and friction points. These insights will help you refine both your design and feature set before writing code.
Pro Tip: Don’t explain how to use it. If users need instructions, your UX isn’t intuitive enough yet.
Why This Stage Matters
Design and prototyping aren’t just creative exercises. They’re risk reducers. By visualizing and testing your MVP early, you catch usability issues long before they become expensive engineering problems.
You’re not designing for perfection; you’re designing for validation, to confirm that your product’s flow, clarity, and usability align with user expectations.
“Good design makes things look beautiful. Great design makes things feel effortless.”
A well-tested prototype ensures your MVP launches with confidence, clarity, and real-world insight, setting the stage for a build that actually delivers value.
Stage 5: Technical Planning and Stack Selection
Now that your MVP’s user experience and feature scope are clear, it’s time to get technical. This stage is where vision meets execution, where product strategy turns into code, workflows, and tools that make your MVP real.
But before you dive in, remember: the goal of an MVP isn’t to build the perfect system. It’s to build a reliable, scalable foundation that helps you validate your hypothesis quickly and efficiently.
The right technical choices can mean the difference between launching in weeks versus months.
Step 1: Choose the Right Tech Stack for Speed and Scalability
Your tech stack determines how fast you can move today and how easily you can grow tomorrow. The key is to strike a balance between speed, cost, and long-term flexibility.
Here’s a quick guide:
Component | Recommended Options | MVP Priority |
Frontend | React, Next.js, Vue.js | Fast, responsive UI |
Backend | Node.js, Django, Laravel, or FastAPI | Lightweight, scalable logic |
Database | PostgreSQL, MongoDB, Firebase | Easy setup, flexible schema |
Hosting/Infra | Vercel, AWS, Render, or DigitalOcean | Quick deploys, auto-scaling |
Authentication | Firebase Auth, Auth0, Supabase | Plug-and-play security |
Analytics | Google Analytics, Mixpanel, PostHog | Measure early engagement |
Pro Tip: Choose technologies your team already knows, familiarity > flashiness for MVPs. You can always refactor once the idea is validated.
Your stack should help you ship, test, and learn fast, without locking you into heavy technical debt.
Step 2: Decide Between Custom Code, No-Code, or Hybrid Approaches
When building an MVP, not every feature needs to be coded from scratch. Sometimes, the smartest move is to use tools that let you validate ideas faster.
Here’s how to decide:
No-Code MVP: Use tools like Bubble, Glide, or Webflow when your focus is on testing user behavior, not engineering performance. Perfect for quick launches and market validation.
Best for: Non-technical founders or concept testing within 2–4 weeks.Custom Code MVP: Build from scratch when your idea relies on unique algorithms, integrations, or data logic.
Best for: Tech-heavy products (AI tools, marketplaces, SaaS platforms).Hybrid Approach: Combine both, e.g., a no-code front end (Webflow) integrated with a custom backend (Firebase or Node.js API).
Best for: Balancing speed with flexibility.
Tip: Your MVP doesn’t need to scale to a million users. It just needs to prove people care. Choose the simplest approach that delivers your validation goal.
Step 3: Set Up the Development Workflow
Even for MVPs, structure matters. A lightweight but disciplined workflow keeps your project on track, ensures smooth collaboration, and prevents chaos as you iterate.
Essential tools and systems to set up:
Version Control: Use Git + GitHub/GitLab for tracking changes and avoiding code conflicts.
CI/CD Pipeline: Automate builds and deployments with GitHub Actions, Vercel, or Netlify.
Task Management: Keep your sprints organized with tools like Jira, Trello, or Linear.
Environment Setup: Use .env files for secure configuration and easy scaling.
Documentation: Maintain a simple README or Notion page to track stack decisions and processes.
Pro Tip: Timebox your sprints (1–2 weeks max). The goal isn’t perfection. it’s progress you can test and learn from.
Why This Stage Matters
A well-chosen stack and workflow can dramatically accelerate validation. By combining the right tools, clear processes, and focused tech decisions, your MVP becomes both efficient to build and easy to evolve.
You’re not just building fast, you’re building smart.
“Speed matters in an MVP, but sustainable speed comes from structure, not shortcuts.”
With your technical foundation in place, you’re ready for the next phase: Stage 6 MVP Development and Testing, where you’ll bring your prototype to life and start collecting real-world data.
Stage 6: Build and Test the MVP
This is where the vision finally takes shape: your research, strategy, and design all come together in a functional product you can put into users’ hands. But here’s the key: building an MVP isn’t about finishing, it’s about learning.
The goal at this stage is to move fast, stay lean, and validate your assumptions through real user interaction. The best MVP teams don’t just build; they build, test, learn, and refine in rapid cycles.
Step 1: Build in Agile Sprints with Clear Deliverables
Forget long, drawn-out development cycles. MVPs thrive on short, focused sprints, 1–2 week cycles, where each sprint delivers something tangible you can test.
Here’s how to structure your build process:
Define sprint goals: What learning or functionality are we validating this week?
Break features into user stories: (“As a [user], I want to [action], so that I can [benefit].”)
Timebox everything: Each sprint should have a start, an end, and a measurable output.
Review and adjust: After each sprint, analyze progress and user feedback before planning the next one.
This rhythm keeps momentum high and ensures you’re continuously moving closer to real-world validation, not just feature completion.
Pro Tip: Focus on working software over perfect software. Users can’t validate what they can’t use.
Step 2: Run Usability and Functionality Tests
Before unleashing your MVP on real users, it’s crucial to ensure it actually works and that people can navigate it easily.
There are two key layers of testing:
Functional Testing:
Make sure the core features work as intended, even if it’s basic.
Check for:
Bugs, crashes, or broken links
Data flow between the front end and the back end
Smooth performance across devices and browsers
Use tools like Postman, Cypress, or Playwright for quick automated testing, and involve QA testers (or even early users) for manual checks.
Usability Testing:
This is where you observe how users actually interact with your MVP. Invite a small group from your target audience and let them try completing specific tasks while you watch (and take notes).
Ask:
Can they understand what the product does right away?
Where do they hesitate, get stuck, or misinterpret something?
Does the MVP clearly deliver its intended value?
Tip: Tools like Maze, Hotjar, or Lookback can help record user sessions and gather deeper insights on behavior.
Step 3: Keep Iterations Tight and Learning-Focused
Once your MVP is live, the real work begins: gathering data, learning from it, and improving quickly.
Avoid the temptation to jump into big redesigns or feature overhauls right away. Instead:
Focus on your validation metrics (from Stage 2).
Identify the top 2–3 insights from user feedback each week.
Implement small, targeted improvements between sprints.
Every iteration should help answer a specific question: Did this change improve user engagement? Did it reduce drop-off?
“In MVPs, learning speed beats development speed every time.”
Why This Stage Matters
Stage 6 is where your MVP transforms from a plan into a living, testable product. But success here isn’t about polishing the product. It’s about extracting insight.
By combining agile sprints, focused testing, and rapid iteration, you build a product that evolves with your users instead of guessing what they want.
“Your MVP isn’t a finished product, it’s a feedback machine.”
Every test, bug, and conversation gets you one step closer to building something people truly need.
Stage 7: Launch and Gather Feedback
After weeks (or months) of research, design, and development, it’s finally time: your MVP is ready for the real world. But launching isn’t about marketing fanfare or perfection; it’s about learning fast from real users. This stage turns your MVP into a live experiment, providing the evidence needed to confirm or challenge your assumptions.
Step 1: Deploy to a Controlled Audience or Beta Group
Instead of opening your product to everyone, start small:
Invite a select group of users who match your target persona.
Use private links, early access invites, or beta programs.
Ensure users understand they’re testing a work-in-progress. This sets expectations and encourages honest feedback.
This controlled launch reduces risk, allows close monitoring, and creates a manageable environment for learning.
Tip: Beta testers can become your first advocates. Keep them engaged with updates and show that their input matters.
Step 2: Track Key Performance Indicators (KPIs)
Collect quantitative data to measure how users interact with your MVP. Common KPIs include:
Activation: Are users completing the core action that delivers value?
Retention: Do users return after their first experience?
Conversion: Are users signing up, paying, or upgrading as expected?
Engagement Metrics: Feature usage, session length, and click-through rates.
Feedback Volume and Sentiment: Qualitative insights from surveys, interviews, or in-app prompts.
By combining quantitative and qualitative metrics, you get a holistic view of how well your MVP delivers on its promise.
Step 3: Identify What Validates or Challenges Your Assumptions
Every interaction and metric should answer a critical question:
“Does this validate my hypothesis, or does it reveal a flaw in my assumptions?”
For example:
If activation rates are high but retention drops immediately, maybe the MVP solves part of the problem but fails to deliver ongoing value.
If users request features outside your MVP scope, note them, but don’t add them immediately; they may indicate future priorities, not MVP essentials.
Positive feedback confirms your core proposition, while negative or missing engagement highlights where a pivot or iteration is needed.
Tip: Treat each data point as a learning opportunity. The goal isn’t to succeed immediately; it’s to gather actionable insight for your next steps.
Why This Stage Matters
Launching your MVP to a controlled audience turns your plan into proof or learning. The insights you gather now will guide every future decision:
Refine features that drive value
Remove friction points that reduce engagement
Decide whether to pivot, persevere, or scale
Remember:
“An MVP isn’t finished until it teaches you something meaningful.”
By carefully launching, tracking KPIs, and interpreting feedback, you transform uncertainty into actionable knowledge, the true purpose of an MVP.
Stage 8: Analyze, Iterate, or Pivot
Once your MVP is live and data starts rolling in, the work shifts from building to interpreting and acting on insights. This stage is where decisions are made: should you refine your current product, expand its reach, or pivot entirely? Done well, this process transforms uncertainty into a clear roadmap for growth.
Step 1: Analyze Feedback and Metrics
Begin by reviewing both quantitative and qualitative data from your MVP launch:
Quantitative Metrics: Activation, retention, conversion, engagement, feature usage.
Qualitative Feedback: User interviews, survey responses, usability notes, feature requests.
Ask yourself:
Are users finding the core value we promised?
Which pain points remain unsolved?
Where do users drop off or disengage?
Which features are most used or requested?
Tip: Look for patterns, not isolated opinions. A single complaint might be an anomaly; repeated signals reveal actionable insights.
Step 2: Decide, Iterate, Expand, or Pivot
Based on your analysis, choose one of three paths:
Iterate:
Make targeted improvements to enhance usability or value.
Optimize features that matter most to users.
Example: Simplifying the onboarding flow if new users struggle to complete key actions.
Expand:
If validation is strong, scale the MVP to a larger audience.
Add non-core features that enhance engagement but stay aligned with the value proposition.
Example: Introduce additional integrations or collaboration tools after proving core task management works.
Pivot:
If data disproves core assumptions, adjust your approach. This may mean changing the user segment, redefining the problem, or rethinking the solution.
Example: Shifting from freelancers to small teams if the target segment shows more engagement and willingness to pay.
Pro Tip: Don’t fear pivoting. Early insights save resources and guide you toward a product that actually fits the market.
Step 3: Maintain a Continuous Feedback Loop
MVP development doesn’t end with the first launch. Establish a cycle of continuous learning:
Collect user data
Analyze and identify trends
Make incremental changes
Test again with users
Over time, this loop ensures your product evolves based on real evidence, not assumptions, keeping your roadmap dynamic and user-centered.
Why This Stage Matters
Stage 8 is where the MVP proves its value beyond just functionality. By analyzing insights, iterating intelligently, or pivoting when necessary, you:
Reduce risk before scaling
Optimize resources for maximum impact
Align the product with real user needs
“The MVP isn’t just a product, it’s a learning engine. Your job is to listen, act, and evolve.”
The feedback-informed decisions made here set the foundation for scalable, user-validated growth, turning early experiments into a successful, market-ready product.
Conclusion
Building an MVP isn’t just about launching a product, it’s about creating a structured pathway to learning, validation, and informed growth. A disciplined roadmap turns uncertainty into direction, guiding teams through research, design, development, and iteration with purpose.
By following a clear MVP process:
Risk is reduced: You avoid overbuilding and invest resources only in features that validate real user needs.
Learning accelerates: Every stage, from problem validation to iterative testing, provides actionable insights that shape product decisions.
Focus is maintained: Prioritization frameworks, a defined scope, and a feedback-driven workflow ensure your team works on what truly matters.
Foundation for scaling: Insights from your MVP inform the next phases, refinement, expansion, or pivot, so when you scale, you’re building a product with proven demand and user alignment.
Ultimately, the MVP is not a shortcut or a half-baked version of your vision. It’s a strategic tool that transforms ideas into validated solutions, giving your team the confidence to scale wisely.
“A successful MVP doesn’t just test a product; it tests assumptions, teaches lessons, and sets the stage for sustainable growth.”
With this roadmap in hand, your journey from concept to market-ready product becomes intentional, measurable, and focused on delivering real value.